
What is the maximum operating speed? What is the maximum operating pressure? What is the working temperature of a gas spring?
Use the following bulletin to view the maximum operating speed and pressure and working temperature of a gas spring:
How long do gas springs last?
DADCO warrants its products to be free from defects in workmanship or materials for a period of one year from date of manufacture. Many of our nitrogen gas springs are backed in writing by the exclusive 1 year/1 Million Strokes Gold Guarantee. DADCO offers a 2 year/2 million strokes Select Guarantee on the L Series (90.3) nitrogen gas springs. Contact DADCO for full warranty details.
DADCO recommends replaced gas springs after 10 years of use.
The following gas springs that are still in use should be replaced: G Series, H Series, M Series, NH Series, NM Series, 90.1 Series, 90.5 Series and 95 Series.
How can I measure the force of my gas springs?
Use the following load cells in conjunction with a test stand or arbor press:
How can I reduce the pad bounce of my operation during stamping?
How can I update my current nitrogen gas spring to a DADCO spring?
Our experts can help evaluate if your existing nitrogen gas springs from Standfast, Standard Lifters, Hyson, Kaller, Special Springs, and others can be converted to DADCO Gas Springs. Contact desk@dadco.net or call (734)207-1100 to make the switch today for improved performance, reliability, and unmatched customer support.
How can I ensure my die built in China is using authentic DADCO gas springs?
In today’s industry, many dies are built in China. In addition to our distributor in China, DADCO also provides local die inspection service to verify and guarantee the authenticity of DADCO gas springs. Contact us today at inspectionrequest@dadco.net to schedule an appointment.
How do I install my new gas springs?
How do I make a SEAL-LOK hose assembly?
How do I make a MINILink® hose assembly?
How do I replace my coil springs with gas springs?
1. Determine force requirements The first step in retrofitting an existing die for nitrogen use is to calculate the force requirement. If you know the force required to complete your operation, simply use this number when selecting the gas springs. If you do not know the total force required in your application, you can calculate the force provided by the coil springs in your die. You must determine if the force required to do the operation is the initial force (at preload) or the final force (at full travel). Once you determine this, you can calculate the total force requirement. The most common method of finding coil spring force is to reference the manufacturer’s force chart. To use the chart you must know the coil spring size, color, preload, and the distance it travels in the die. A load cell can also be used to determine coil spring force. Once you have found the individual force of the coil springs, multiply it by the total number of coil springs in the die to calculate the total force requirement. Example: Ten .75″(19 mm) x 5″ (127 mm) diameter coil springs each provide 80 lbs. (.3 kN) of initial force when preloaded .75″ (19 mm). Total Initial Force = 80 lbs. (.36 kN) x 10 = 800 lbs. (3.6 kN) of force.
2. Calculate gas spring quantity First, you should match the diameter of the gas spring to the diameter of the coil spring. Gas springs are available in all of the popular coil spring sizes, from .5″ (12 mm) to 2″ (51 mm) in diameter. To determine how many gas springs you will need, divide the total force requirement by the highest force available at that diameter. In most cases fewer gas springs are required to meet force requirements. Keep in mind, however, that the force must be distributed evenly on the pressure pad. You may need to use more gas springs of a lower force model to balance pressure in the die. Example: A .75″ (19mm) diameter gas spring is available in a 200 lbs. (.9 kN) force model. Divide total force required by gas spring force to determine gas spring quantity. Quantity = 800 lbs. (3.6 kN) ÷ 200 lbs. (.9 kN) = .4 If necessary to balance pressure in your application, you can choose a lower force model and increase the number of gas springs.
3. Select gas spring stroke length The final factor to consider when selecting the gas spring is the stroke length. To choose the right gas spring stroke length, first determine the distance the coil spring travels in the die. Add a minimum of 10 percent to the coil spring travel and choose the gas spring stroke length that is equal to or greater than this number. Example: The coil spring measures 5″ (127 mm) free length, is preloaded .75″ (19 mm) and is traveled .75″ (19 mm) in the die. Add 10 percent to coil spring travel to determine minimum gas spring stroke length. Minimum stroke length = .75″ (19 mm) + (.75″ (19 mm) x 10%) = .825″ (21 mm). Once you have determined the minimum gas spring stroke length, you can then select the particular stroke length that is best suited to your space requirements. For example, if your application requires that you preload the gas spring, select a stroke length that is greater than the minimum length to allow for preload. When possible, select the stroke length so that the OAL of the gas spring is as close as possible to OAL of the preloaded coil spring. Example: The coil spring is preloaded .75″ (19 mm) to meet the force requirements. Its OAL at preload is 4.25″ (108 mm). In this example you could select the gas spring with a .98″ (25 mm) stroke. This spring would have a corresponding OAL of 3.62″ (92 mm). Alternatively, you may select a longer stroke and preload the gas spring to meet your space constraints. In our example, a spring with a stroke length of 1.5″ (38 mm) and an OAL of 4.65 (118 mm) could be selected and preloaded .40″ (10 mm).
4. Install the gas spring In most applications the nitrogen gas spring can be installed easily in the same cored pocket used for the coil spring. Simply ensure that the bottom of the pocket is flat and that the sides of the hole are square to the pressure pad. The pocket depth should be a minimum of 50 percent of the length of the gas spring can or 1.25″ (32mm) whichever is greater. The pressure pad should have a smooth area for the gas spring rod to contact and should remain in contact with the rod throughout the stroke. In some applications, you can take advantage of gas spring mounting options, such as attachable flange mounts, tapped hole(s) in the base of the cylinder, and threaded body styles. These options offer increased flexibility for using nitrogen gas springs in existing dies. When the size of the gas spring selected does not match the coil spring being replaced, there are simple steps that can be taken before installing the gas spring. Spacers or sleeves may be used in the pocket if the gas spring is smaller than the coil spring, or the gas spring may be flange mounted in the appropriate position. If the existing pocket is too shallow it may be cored deeper, if possible, or the gas spring may be preloaded to meet space requirements. When coring a pocket for gas spring installation, maintain a clearance of .02 to .04 inches (.5 to 1.0 mm) to the diameter of the gas spring. One final concern when installing the gas spring is the use of fluids in the die. Direct contact with certain die lubricants, coolants and cleaners can be harmful to gas springs and should be avoided. Shield gas springs from harmful fluids and provide adequate drainage in gas spring pockets.
How do I repair my gas springs?
- Determine the repair kit needed.
- Follow repair bulletin to repair gas springs.
How do I convert a gas spring from self-contained to a linked operation?
90.5B2 / 90.10 / 90.8 / UX / UH / UT / SCR Series (G1/8 Port)
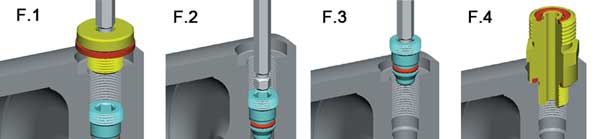
Self-Contained to Linked Operation
- Always wear safety glasses when maintaining nitrogen gas springs. When exhausting pressure, place the gas spring horizontally with the port up for safety.
- Remove port plug 90.505.110 (F1). With the cylinder in the horizontal position, depress the steel valve stem using the appropriate tool (F2). Cover the port with a cloth to absorb discharge.
- After all of the gas pressure is exhausted, be sure that the piston rod retracts into the tube manually. If not, try depressing the valve again. If still unsuccessful, stop and contact your DADCO service representative.
- Remove the valve using the appropriate tool (F3). Lubricate the threads and O-ring of the port adapter being installed (F4).
- Install port adapter in open port (F4). A wide variety of port adapters are available, see DADCO’s 90.10 Series Catalog.
Are there recommendations I should follow when linking DADCO gas springs?
Can the Micro Series gas springs be linked in a system?
Is there a simple way to link multiple cylinders together to a common control panel?
How do I monitor, fill, and adjust the multi panel?
Is there a tool to monitor gas spring pressure from outside of the press?
How do I charge a gas spring?
Never fill a gas spring unless the rod is in the fully extended position. Filling a gas spring with its rod down can result in an improperly seated retaining ring. Thread a T-handle into the rod end and depress the valve stem with the appropriate tool, then pull the rod cartridge assembly up until it is seated firmly against the retaining ring.
- Prepare the Filling Port. Self-contained operation: Attach a filler valve to the port. Linked system operation: Pipe all gas springs back to the control panel. Make sure all hoses and fittings are tight. Attach the charging assembly to the control panel.
- Set the desired charging pressure on the regulator.
- Open the main valve on the nitrogen tank.
- Slowly open the shut-off valve and allow each gas spring to reach the desired charging pressure.
- After each spring has been charged to the desired pressure, close the shut-off valve and tank shut-off valve. Disconnect the charging assembly from the control panel or gas spring port. The small amount of nitrogen trapped between the shut-off valve and the filler valve will bleed off as you disconnect the fitting.